Expand a partition by shrinking the other one
Imagine this situation where your hard drive is filled with tons of partitions and the one that has a lot of space is at the end / middle. You wanna expand a partition with that remaining lot of space. This tutorial will help you with that!!
Please make something clear:
- READ THROUGH THE WHOLE ARTICLE CAREFULLY AND THEN START THE PROCESS.
- Your data won't be lost during this process, unless you interrupt!
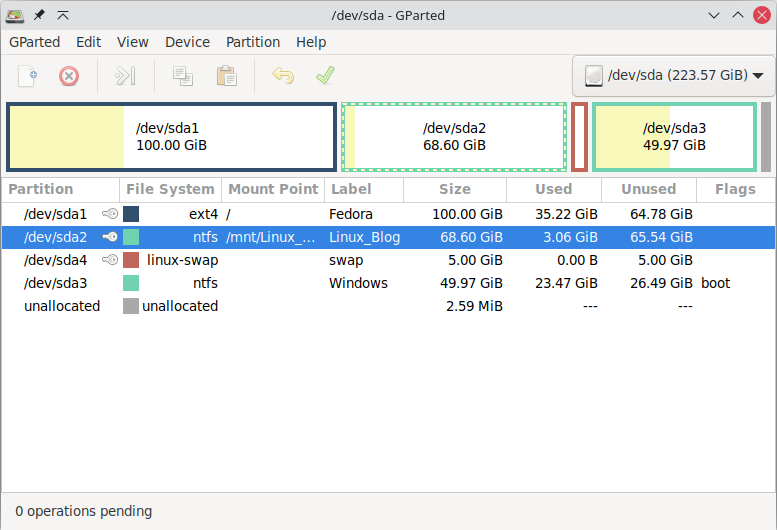
An overview of what we're gonna do here
Shrink 10GB from Linux Blog, which is
/dev/sda2Move the unallocated space past the partition
Add that 10GB into the root partition, which is
/dev/sda1
Mandatory requirements
If you're gonna extend some random partition, then nothing is needed in specific. Except Gparted (just run sudo apt install gparted and you'll get it)
If you're gonna extend the Windows partition, then you should first boot into Windows and disable fast startup (steps for disabling fast startup at the beginning of mentioned article).
If you're extending the root partition in Linux, then you definitely need a Live USB of any Linux distro (like Ubuntu, Fedora or Linux Mint).
Detailed steps
First of all, get ready with a bootable USB of any Linux distro, which is very important for extending the root partition. Then, follow the below steps.
Now, boot into the Live USB, and get into the desktop. For instance, consider the Ubuntu live USB where you have to click Try Ubuntu in order to get into live mode.
Once you're inside, start up GParted from the app menu. Even though it's not available in Ubuntu, it's included in the Live USB by default.
Here are the steps:
Step 1:
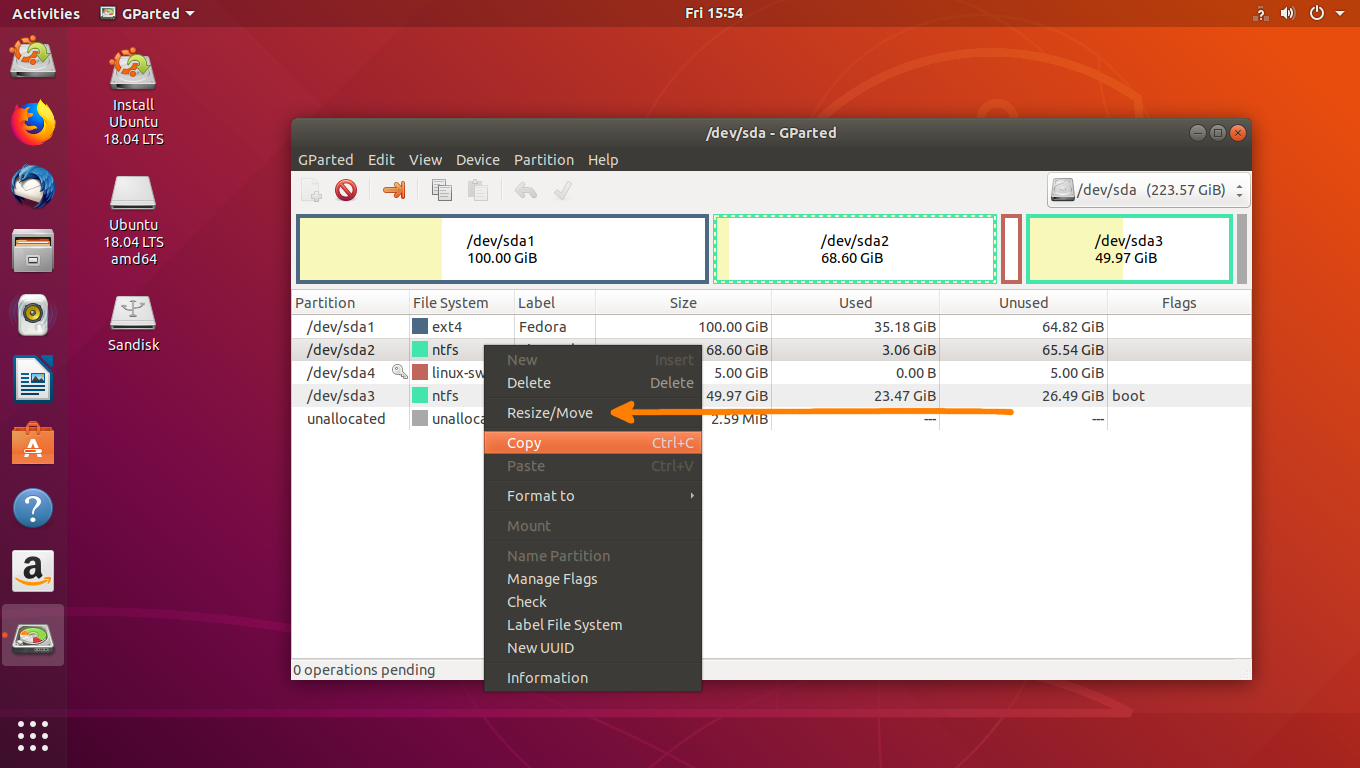
Once you're inside GParted, please double check the name of the partition and its space, because choosing the wrong one may lead to problems, and you try to move this to that etc and there a mess is being created. So, double check the partitions.
Step 2:
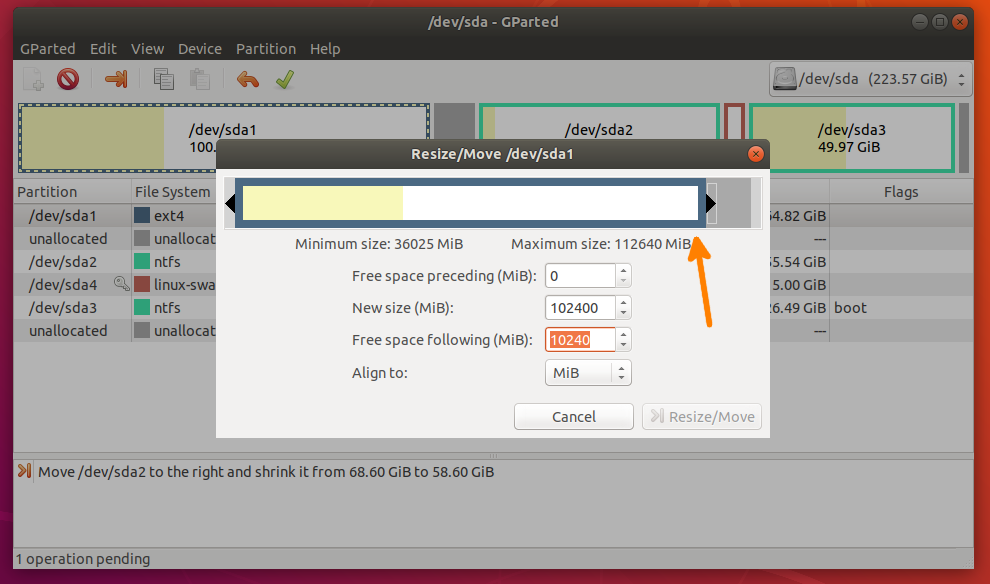
Once you've located the partition, shrink whatever size you want, at the first text box: Free Space Preceding the partition (MiB).
Note: In order to shrink the required space, you must enter the amount in Megabytes, not Gigabytes. If you're struggling to do that, just multiply the amount of space needed to shrink (in GB) by 1024.
For example, if you're gonna shrink 10 GB, then multiply 10 by 1024, which is 10*1024 = 10240 MB.
Step 3:
Once you've done shrinking the required space from the partition, now extend that free space into the required partition. You can do that by dragging the arrow till the end, or entering zero inside the text box Free Space Following the partition (MiB).
After extending till the end, it looks like the below image. Click Resize/Move after extending.
Step 4:
As soon as you've done a job, you may notice that the operation is shown at the bottom (which is pending). Once you've done all the jobs, press the tick mark below the menu bar. This applies the changes that we have committed till now.
It will ask you again for a confirmation. Press Apply for the changes to occur.
Moving partitions past the swap
If you are moving the unallocated space from a partition past the swap, then you should unlock the swap partition first. You definitely require a Live USB if you're gonna move past the swap partition.
First, we have to disable the swap partition by clicking Swapoff from the right click menu. Apply the changes. And then carry out the process.
Important:
Till now, we have defined the changes which should occur. The changes are applied only when you confirm, and nothing happens till you do.
Moving the partition may take so much time depending on the amount of data present in the partition, and also on the type of storage device - HDD or an SSD. If it's a HDD, then it may take a pretty long time, so be patient.
You must never ever interrupt the process of moving the partition, since it may cause data loss. Please connect your laptop to a power source since anything may happen to the battery in between.
Wrapping up
I hope you're clear with this process of moving a partition. Please, once again, be patient while carrying out this process because a single mistake may lead to data loss.
If you don't understand something or you're not clear with any step, please drop a comment here. I'll respond as soon as possible, since I get a notification.
Thanks for reading, and Happy Linuxing :)


Comments
Post a Comment